Lauren on Living

A Lifestyle Blog about Simplifying Healthy Living

  • Home
  • Health
  • My life
  • Recipes
  • Hire Me

Recipe: Creamy Broccoli Soup

June 11, 2014 by lauren.anvari@gmail.com Leave a Comment

IMG_7891

This soup is so creamy and decadent, yet packed with nutrients, you’ll never believe it’s good for you!  The hemp seeds and the cashew meal give this soup it’s creamy texture, which combined with the delicious flavor will be sure to make your taste buds sing! Plus it’s SUPER easy to make.

Saute until tender:

1 Onion

3 cloves garlic

1 head broccoli

3 stalks celery

4 mini yellow peppers or 1 large one

1 tbsp earth balance (or olive oil)

ADD and bring to a boil:

4 cups water + 2 tsp veggie bouillon OR 4 cups veggie broth

1/2 cup Nutritional yeast

1/2 cup Hemp seeds

1/4 cup cashew meal

1 tsp paprika

salt and pepper to taste

Simmer for 15 minutes then blend with an immersion blender until smooth and creamy. 

Enjoy!

Filed Under: Recipe Tagged With: broccoli, Creamy Broccoli Soup, delicious soup, hemp seeds, quick meal, soup, vegan

#YesAllWomen

May 30, 2014 by lauren.anvari@gmail.com Leave a Comment

Like every other woman on the planet, I too live in constant fear. It makes me sick that what I fear most is my fellow man.  I have been cat-called, harassed, assaulted, objectified, stalked and belittled more times than I can count.  Every single day that I leave my home I endure this in one form or the other.  I can feel eyes boring into my body, coating me like oil.  I want to turn and scream, to lecture, to rebuke, but I’m afraid.  What if it makes it worse?  What if he gets mad?

It is a sad world we live in.  Women are being imposed upon. Men are imposing.  This is a not a women’s issue.  This is a men’s issue!  It’s not okay that this practice has become so common place that I often don’t even give being harassed a second thought.  And now, I fear for Asher too.  I must protect him.  How can I protect him?  I WILL protect him!

One in three girls are sexually abused.  One in six boys are sexually abused.

It’s long past time that we stand up and squash this onslaught and it’s the men that need to champion this cause.


Just a girl 


Six years old, bike wheels and pig tails.

You, a man, loomed at me and beckoned.

Attempted to lure and steal a kiss.

My innocent lips.

Just a girl.


Twelve years old, flowered jumper and sun kissed skin.

You, a man, dripped honey from your poison lips.

Pinched and fondled.

My budding breasts.

Just a girl.


Eighteen years old, club beats and foam party.

You, a man, slithered closer unseen.

Pressed your fingers to cold numb skin, felt too late.

Fingered my soul.

Just a girl.


Twenty-two years old,  summer heat and joy filled days.

You, a man, stalked and cornered.

Grabbed and touched. A witness sighted.  Fled.

Close call.

Just a girl.


Join and follow along at #YesAllWomen

Filed Under: My life, Stereotypes Tagged With: #yesallwomen, abuse, boys, girls, harassment, men, sexual abuse, yes all women

The Anvari Chronicles: Niagara Falls, Ontario Canada

May 25, 2014 by lauren.anvari@gmail.com Leave a Comment

We took a road trip up to Canada for my father in-law’s cousin’s wedding.  It took us 9 hours to get there, but Sir Asher was a total champion in the car, even though we only stopped once (the trick is to have part of the trip be at night).  It was wonderful to be able to meet some of Rafaan’s extended family and Asher loved spending time with his Mamani and Baba Joon.  The trip also marked Asher’s 5th country (including the US) in a year and a half, making him well on his way to becoming a world traveler!

IMG_7719

IMG_7754

Filed Under: Anvari Chronicles Tagged With: Canada, family, Niagara Falls, road trip

The Anvari Chronicles: Waterford, Ireland

May 23, 2014 by lauren.anvari@gmail.com Leave a Comment

Back in December, we traveled to a wet and soggy, albeit, beautiful Ireland for the wedding of one of our dearest friends, Kent to his lovely bride, Sarah.  We met Kent while living in Israel and working at the Baha’i World Centre (BWC).  He sang at our wedding and is always game to come over and sit on our couch with us and watch endless hours of HGTV.  Needless to say, we were not going to miss his wedding.  Sarah is everything he has ever wanted and then some and we’re just so happy to add her to the family.  The only down side, is that they will be living in Ireland, which will seriously decrease the amount of HGTV episodes we watch together.

The wedding was a bit of a BWC reunion, with many of our close friends traveling from all over to celebrate the union of these two bright souls.  Asher was a champion on his third international trip and wasn’t even affected by jet lag at all this time (thankfully!).

IMG_7237

The view from our flat.

IMG_7272

IMG_7297

Our sweet niece, Lua.

IMG_7319

The happy and exhausted couple – Kent & Sarah.

IMG_7323

IMG_7341

IMG_7349

IMG_7356

IMG_7360

IMG_7361

The award for perfect photo-bombing form goes to Sir Ian Hamilton.

IMG_7366

Filed Under: Anvari Chronicles Tagged With: Baha'i World Centre, Ireland, travel, Waterford, wedding

Recipe: Fig Bars

May 20, 2014 by lauren.anvari@gmail.com 1 Comment

IMG_7776

These fig bars may look impressive, but I promise,  they’re super easy to make and delicious to boot!

Ingredients:

Shortbread base:

1/2 cup Earth Balance

1/4 brown sugar OR (1/8 cup sugar  + 1/8 cup molasses) OR 1/4 cup maple sugar

1 tsp ground cinnamon

1 1/2 cups all purpose flour

Fig Topping:

2 1/3 cups (13 oz) dried figs

1/4 tsp cinnamon

1/2 cup sugar OR 1/2 cup maple sugar

1 1/2 cups water

Directions:

Preheat oven to 350 degrees Fahrenheit.  Lightly grease a baking dish and line with parchment paper (make sure the parchment paper is hanging over the sides, so you can lift the bars out easily). Beat the the earth balance, brown sugar and 1 tsp cinnamon until well combined, then mix in the flour using a spoon until well mixed.  Press the mixture into your baking dish and bake for 25 minutes.

Put the dried figs, 1/4 tsp cinnamon, sugar and water in a sauce pan and bring to a boil.  Reduce the heat and let the figs simmer for 20 minutes until they are soft and the liquid has reduced.  Place the mixture in a food processor and pulse until smooth.  Spread the fig mixture over the shortbread base and bake for 12 minutes.  Allow to cool completely, then lift out and cut into squares.

Enjoy!

Filed Under: Recipe Tagged With: dessert, easy dessert, fig, Fig bars, plant based, shortbread, vegan

Asher’s Frenectomy // Lip Tie & Tongue Tie

April 28, 2014 by lauren.anvari@gmail.com 2 Comments

photo (36)

So it turns out Asher had a lip tie and a tongue tie.  We knew he had a tongue tie, because waaaay back when we had thrush a lactation consultant told me he had one but that it would stretch out with time, but the lip tie was a bit of a surprise.  Although, it was the kind of surprise that once you learn about you feel really stupid for not realizing sooner because you kind of knew something was up all along.  Yea, that kind of surprise.

Raf and I had always noticed Asher’s upper lip had two ridges of tissue that connected it to his gums, we both agreed that it was a bit odd, but really didn’t give it much more thought.  One day I was on a play date with my friend and her son (who had just had a frenectomy) and she pointed out that she thought Asher had a lip tie.  She then proceeded to send me this and this.

Well, after a bit of research I decided two things.  First I concluded that she was in fact correct and that Asher did have a lip tie.  Second, I knew I wanted him to have a laser frenectomy instead of using a scalpel and sutures.

I took Asher to his pedatrician who suggested I consult a pediatric dentist.  After a lot of time spent researching and calling pediatric dentists that would do a laser frenectomy on an 11 month old, I found Ashburn Children’s Dentistry, so I called and made an appointment.

Asher was seen by Dr. Rishita Jaju, who is exceptionally qualified to handle a laser and who determined that he needed to not only have the lip tie removed but the tongue tie as well.

I felt very strongly about using local anesthesia rather than general or IV sedation, considering that it was a minor procedure I didn’t want to add any addition risk by using strong drugs.  This meant, that Asher would be awake and would have to be restrained during the procedure.  And let me tell you, that part was not fun.  Raf held Asher in his lap and we both restrained him while Dr. Rishita performed the frenectomies.  Asher screamed the entire time, not from pain of course, but he did NOT like having all the fingers and tools in his mouth one bit.  The whole thing took about an hour, which was WAAAAY longer than I expected it to take, but I guess Dr. Rishita had to work more slowly to account for his wriggling.  Immediately after it was over, Asher sat up and cuddled next to me and sucked his thumb.  For the next few weeks, I had to rub the frenectomy sites a couple times a day to prevent the tissue from reconnecting while it healed.

Asher’s lip and tongue have both healed perfectly and the gap between his two front teeth has almost closed.

These are the main reasons we felt strongly about having these frenectomies done:

-To prevent has possible speech issues

-To help prevent cavity formation

-So the gap between his front teeth would close (reducing the likelihood of braces)

-To free up his smile

In retrospect, I believe that a lot of my milk supply issues could be have been due to Asher’s lip and tongue ties, luckily we were able to power through and nurse through Asher’s first year, but in the future I’m definitely going to be more on top of ruling out any lip or tongue ties if I’m having nursing problems.

*While I was really happy with the care Asher received I think if I had to do it over again I would have a consultation with an ENT.  Some ENTs are now doing frenectomies using only laughing gas and cauterization and these procedures can take only a couple of minutes.   I didn’t learn about this option until after Asher had already had his done, but I’d definitely recommend exploring this route in more depth to anyone who has a child with a lip tie or a tongue tie. 


Filed Under: Health, My life Tagged With: 11 month old, Frenectomy, laser frenectomy, lip tie, tongue tie

Teething

March 27, 2014 by lauren.anvari@gmail.com 1 Comment

Often, many parents blame everything from fussiness to drool on teething and while that may very well be the culprit, it isn’t always the case.

The number one thing that I have heard parents associate with teething is drool.  Copious amounts of drool.  And yes, babies do often drool more when they are teething (this is especially true for babies who were already droolers), but drool on it’s own is not a sign of teething.  Asher started drooling like a faucet at 2 months old but he didn’t get his first tooth until he was 7 months old.  Five months of teething?  I think not.  In fact, drooling is an important part of cognitive development for babies  and even though some babies may not seem to drool, it’s just because they’ve figured out how to swallow the excess saliva rather than dribble it out.

All babies experience teething differently.  Some babies are inconsolable while others will pop a pair of molars without anyone being the wiser.  There is really no way to tell but in general most babies fall somewhere in the middle, with some teeth bothering them more than others.  So even though most parents (myself included) love to blame a bout of fussiness on teething, it just may not be the case.

The only sure fire way to tell if your child is teething it to look for red, swollen and inflamed gums in the area you expect a tooth to appear.  And keep in mind that teeth generally appear in pairs although they’re usually staggered.

Teething discomfort (if it’s present) can last anywhere from 2-3 days up to a week PER tooth for the canines and incisors, but the molars can take anywhere from one week to several months.

While teeth can appear in any order and at a wide range of times (some babies are born with pearly whites, while others are all gums until well after a year) on average the first tooth usually appears around 6-10 months.  The following image illustrates the most common order and age range of eruption for primary teeth:

Ok, ok, that’s all very well and good you say, but what you really want to know is what you can do to help sooth a baby who’s having a rough time of teething.

Well let me start off with what you shouldn’t do.  DO NOT use any products containing benzocaine (ex. Orajel).  Doing so can lead to methemoglobinemia, which is a serious and sometimes fatal condition, which is why the “FDA recommends that parents and caregivers not use benzocaine products for children younger than 2 years, except under the advice and supervision of a health care professional”.

Instead you can try any or all the following:

Using a teething ring or wet wash cloth that has been chilled in the refrigerator (not the freezer).

Acetaminophen and Ibuprofen are great options (especially at night when other methods may interfere with sleep).  Although you should always check with your pediatrician first before using any medications, (including homeopathic ones).

Massage the area with your finger.

Put frozen fruit in a mesh baby feeder and letting your baby (6 months and older) gnaw on it:

What are your experiences with teething?  Do you have any remedies that you swear by?

Filed Under: Health Tagged With: babies, benzocaine, orajel, teething

Baby Products I Adore

February 28, 2014 by lauren.anvari@gmail.com 1 Comment

Woombie:

I love love LOVE the woombie!  Due to Asher’s over active arms he had to be swaddled to sleep and the woombie made it effortless. The woombie is so amazing that I wrote a full review for it, which can be found here.  Get at least two and don’t look back.

Fisher-Price My Little Snugabunny Bouncer

This thing was a life saver the first few months.  The vibrations lulled my boy to sleep and kept him that way for a good while.  Asher also had reflux in a BIG way and keeping him more up right helped reduce the amount of spit ups and projectile vomits. Some nights I would even drag the snugabunny into our room and have him sleep in that the whole night.  Worked like a charm.

Graco Pack ‘N Play Playard with Reversible Napper & Changer:

Having a pack n’ play in our room the first few months was great!  It allowed us to keep Asher close at hand when he was itty bitty and this particular one even had a napper attachment that cradled him in a safe way.  Since we’ve moved Asher into is own room and crib we have still used the pack n’ play a TON.  We take it on road trips, use it as a barricade in a pinch and create a portable play pen (just to name a few of the many ways we’ve used it).  It’s great and I’m glad we have it.

Baby K’tan:

I can not rave about the Baby K’tan enough!!  This soft baby carrier is awesome.  SO simple to use and QUICK!  It’s amazing to travel with and wonderful to use, especially when the baby is little.  When the baby isn’t in it, you can either wear it as a scarf or toss it in a diaper bag.  It’s amazing.  This is another product that stands out and got it’s own full review, which can be found here.

Beco Gemimi

The Beco Gemini is simply amazing!!  It is my go to structured carrier.  It does everything the Ergo can do AND more!!  Namely it allows for a front facing out baby wearing position.  It can also be used for a newborn WITHOUT needing a newborn insert.  This carrier offers amazing back support, which is KEY for when the baby gets to be on the heavier side.  I’m obsessed, and this really deserves it’s own full review, which I hope to get around to eventually.

Shi Shu Baby Handwoven Baby Blanket

Being a winter baby Asher was gifted with tons of snuggly fleece blankets, which while soft, I didn’t love that they were all synthetics and Asher would sweat a lot in them.  I wanted something made of natural fibers that would breathe and yet would still be soft and warm.  Well the Shi Shu Baby blanket has surpassed all expectations I could have for a blanket.  It’s cotton bamboo mix leaves it incredibly soft, while totally breathable.  It’s just the right size for carting about and has traveled the globe with us.  It has a great woven texture and silky sides!  Asher won’t sleep with anything else.

Shi Shu Baby Handwoven Snuggle Blanket

When Asher began protesting separation from his beloved Shi Shu baby blanket I realized that we needed to get another, so we could rotate them for laundry day and to just generally never be without one.  I opted for the snuggle size and I’m SO glad I did.  Asher carries this one around the house with him, often chewing on it or cuddling with it, and due to it’s tiny size he doesn’t trip over it.  Yet, when the bigger one is dirty, I’ve found that I can put this snuggle sized one in his crib with him and he sleeps soundly.  They’re AMAZING!

Baby Jogger City Mini GT Single Stroller

When I was pregnant with Asher I watched COUNTLESS YouTube videos about this stroller.  I was obsessed.  I never thought I would be excited about a stroller let alone bouncing off the walls!  Baby Jogger is a great brand in general, and I think that several of the strollers that they offer are awesome.  I opted to go for the City Mini GT because I liked that it had a heavier weight limit, which meant that it would last us a looong time, the forever air tires are great, it has a full recline, you can maneuver it with ONE finger, it has a super smooth ride, the sun shade is EPIC, and it has a one handed fold (just to name a few of it’s features).  I’ve even taken it jogging (even though it’s not technically a jogging stroller).  I HIGHLY recommend this stroller.

Chicco Key Fit 30 Infant Car Seat and Base

I spent HOURS researching infant car seats and in the end I went with the Chicco Key Fit 30, because it is extremely well made, very safe and a breeze to install.  It even clicked right into my City Mini GT stroller (with an adapter).  For a while I debated getting a Maxi Cosi car seat but in the end I’m really happy that I stuck with the Key Fit 30.  Despite having an upper weight limit of 30 lbs my super long baby out grew the length limit (29 inches) by around 6 or 7 months, but until that happened, I loved the ease of this infant car seat.

Chicco NextFit Convertible Car Seat

The Chicco Key Fit 30 was great but the Chicco Next Fit is spectacular!  It is self ratcheting and so easy to install that the baby could almost do it himself (well not exactly, but close).  I actually took Asher to the store and put him in 3 different car seats (Maxi Cosi Pria, Britax Marathon, and Chicco Net Fit).  Chicco won by a land slide, he just looked way more comfortable in it.  At the time this car seat was new to the market so there weren’t many reviews out there, but I trusted the brand and the store trial run really hit it home.  This car seat is loaded with safety features and can even be reclined while it’s installed when it’s in the forward facing position.  I love it!

*UPDATE*

Chicco recently came with the Nextfit Zip Convertible Car Seat, which has all the benefits of the original Nextfit, but with a few added features that take this already incredible car seat to a whole new level.

Inglesina 2013 Fast Table Chair

This travel high chair is so compact and easy to use that I even packed in my CARRY ON bag and took it to Ireland with us.  It was a LIFESAVER.  The flat we were renting didn’t come equipped with a high chair and having the Fast Table Chair with us allowed me to be hands free and gave Asher the freedom to munch his meals comfortably.  There are a few others like it out there on the market, but again I took Asher to the store and put him in a few and he just looked SO much for comfortable in this one.

Ikea Antilop High Chair with Safety Belt

Right away I knew that I wanted a super simple high chair with NO fabric on it anywhere.  I wanted something, compact, easy to clean, functional and light.  Well the Antilop wins in all those categories PLUS it’s only around $30 for the chair, tray and support cushion.  The legs pop off so you can throw it in the car and take it with you when you’re going to visit someone that doesn’t have a high chair (read: almost everyone).  If you don’t feel like using the tray, just pop it off and slide the high chair right up to the table.  It’s versatile, simple, efficient and pretty.

Chicco Dance Walker Activity Center

We didn’t get too much use out of this, because even before Asher walked (at 9 months) he was pulling to standing and cruising around and had decided that he didn’t want to be contained.  BUT when we did use this, he LOVED it.  I could put him in here and run to the bathroom or set him in it while I cooked and I could rest assured that he was contained and not trying to peel a cover off of an electrical socket with his tongue.  It’s collapses to be totally flat, makes lots of fun sounds and is totally interactive.  If you get tired of all the sounds it makes you can plug your ipod into it and play songs you like better.  The toy console also pops off and you have yourself a handy tray.  Plus it’s super cute to watch your baby zoom around in.

Okkatots Baby Depot Diaper Bag Backpack

This backpack is the KING of travel diaper bags.  We’ve taken this one on several international flights as our one and only carry on item.  One carry for all of my stuff, Raf’s stuff and Asher’s stuff.  Seriously, it fit everything we could ever want and then some, while keeping it all organized and easily accessible.

Boogie Wipes

Baby noses are tiny and sometimes they get crusty with boogers and these boogie wipes making cleaning that situation up painless and SO easy.

Nosefrida The Snotsucker Nasal Aspirator

The Snotsucker is a lifesaver!  I never thought that sucking snot out of my infant’s nose with a tube that ends in my mouth would sounds appealing, and well okay, it still doesn’t BUT this thing is a miracle worker.  It’s gets rid of the snot river that tends to run from Asher’s nose straight into his mouth and helps him breathe easier when he’s sick.  Plus there is a filter so the snot doesn’t get anywhere near your mouth.  The Snotsucker is WAY better than those stupid bulb syringes, it gets out 3 times the snot in a fraction of the time and since I’ve never met a  baby that likes having their nose messed with, that’s really priceless.

Filed Under: Product review Tagged With: Baby Jogger City Mini Gt, baby k'tan, beco gemini, Boogie wipes, Chicco dance walker, chicco key fit 30, chicco next fit, graco pack n' play, Ikea antilop high chair, Inglesina Fast Table Chair, Nosefrida, okkatots baby depot diaper bag backpack, product review, review, Shi Shu Baby, Shi Shu Snuggle, Snotsucker, snugabunny bouncer, woombie

The Menstrual Cup – Sckoon & Lunette Review/Comparision

January 28, 2014 by lauren.anvari@gmail.com 12 Comments

IMG_7554

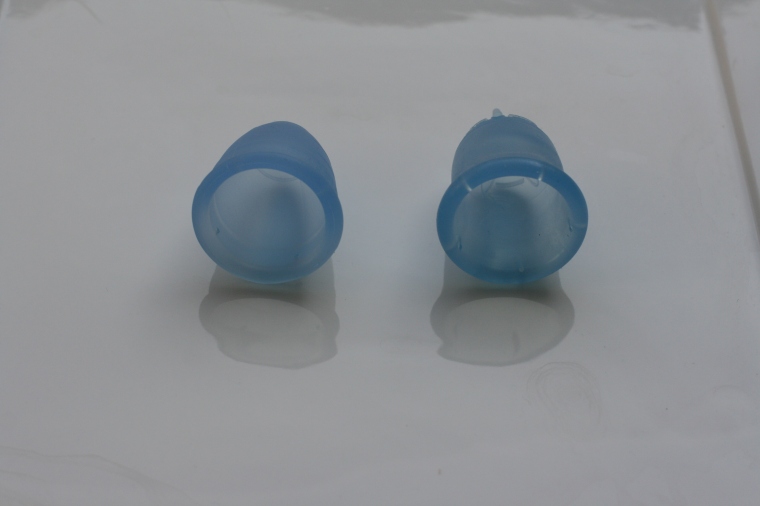
Left: Lunette Cup, model 2 in color: Selene – Right: Sckoon Cup, size 2 in color: Balance

Ladies, this is a game changer.  A life changer.  I’m talking about the menstrual cup.  These things are Amazing with a capital A!  I honestly can’t rave about it enough, except to say that the cup almost makes me look forward to my period and that’s really saying something.

If you thought tampons were great, you’re going to laugh at how horrid they seem after trying the cup.

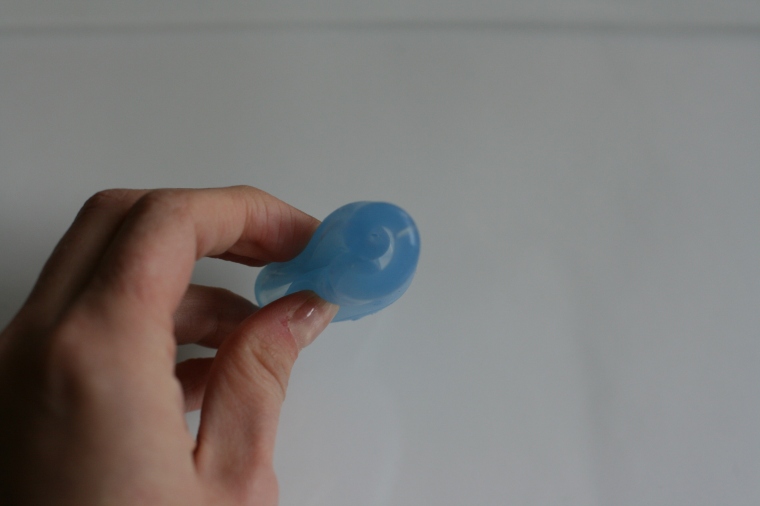
So what are they?  Well, a menstrual cup is a small cup like vesicle that gets inserted into the vagina during menstruation in order to collect the menstrual flow.  The vast majority of cups are made from medical grade silicone.   Unlike a tampon, which is worn high in the vagina, the cup is worn low in the vagina and is soft and pliable so it creates a seal with your body to ensure no leaks happen.  The cup get folded for insertion and then opens up once it is inside the vagina.  To remove, simply pinch the bottom to break the seal and remove.  After emptying the cup, simply rinse in COLD water and re-insert, you can wash it with a mild soap and some warm water after the initial cold water rinse if desired.  Between cycles, you can sanitize your cup by boiling it in some water for a few minutes, giving it a rubbing alcohol bath or washing it thoroughly with warm water and a mild soap.

Now let me just say that there is a bit of a learning curve when it comes to using a menstrual cup, so you should expect to wear a liner or pad in addition to your cup for a cycle or 2 before you master the hang of it.

Even though menstrual cups have been around for a looong time, they are only recently becoming more mainstream.  There are many brands of menstrual cups available on the market today.   In my experience the ones that are the easiest to access in the United States are: Diva cup, Lunette cup and Sckoon cup.  After doing a bunch of research, reading tons of reviews and watching a whole load of youtube videos, I decided to purchase the Lunette cup in model 2, however right after I did so, the Sckoon cup came onto the market and it was just really appealing so I went ahead and got one of those in a size 2 also.

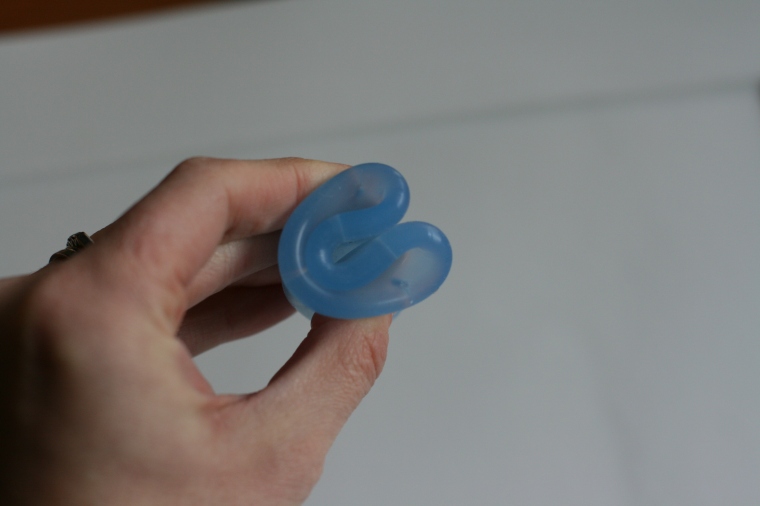
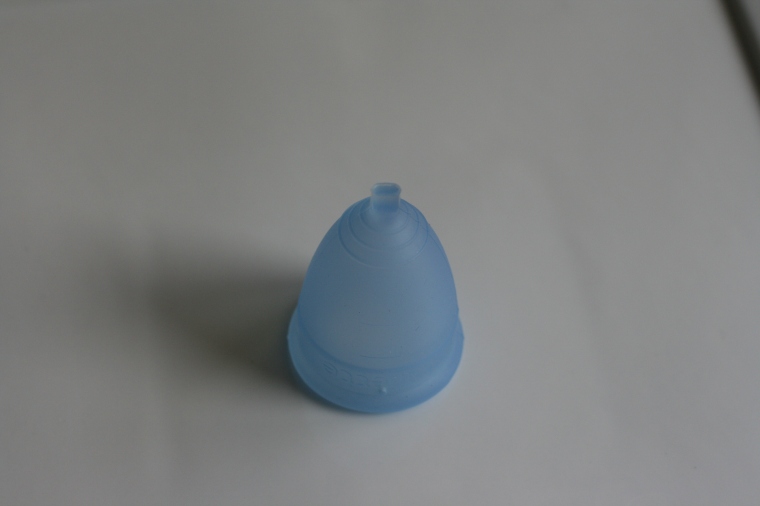
I really wanted to love the Lunette cup, it was so easy to use and the silicone wasn’t too soft, which made inserting it a breeze, the tab wasn’t hollow (a must for me), but it did poke me a bit so I ended up trimming it.  However, I kept having leak issues.  No matter what I did or how I inserted it, the thing would leak but when I went to remove it there was hardly anything in it.  Now, this is not a testament to the cup, because it really is an awesome cup.  It just simply didn’t work with my body.  During menstruation my cervix drops fairly low and sits inside the cup, leaving little room for the blood to collect.  So feeling disappointed but determined I tried the Sckoon cup and voila! Success!!  The Sckoon cup in shorter and has a wider base which allows my cervix to sit inside the cup, while still leaving plenty of room for collection.  The Sckoon cup is softer than the Lunette, and the tab is really flexible and soft, so I found I didn’t need to trim it at all.  The softness of the Sckoon makes it a bit more difficult for me to get it to pop open after insertion, but I’ve figured out a method that works just fine.  Basically I use the punch down fold to insert the cup, then I wiggle it around a bunch while pinching the bottom to get to open up, finally I run my finger around the perimeter to ensure that my pesky cervix is actually inside the cup.  It’s a bit hard to explain in writing, so I highly recommend the channel, MenstrualCupInfo on youtube to learn more about all the cups out there and to help you get an idea about what may work best for you (but of course I’m always happy to answer any questions you may have as well).

The Pros:

Use of menstrual cups is not associated with Toxic Shock Syndrome (TSS)  (ahem, TAMPONS)

Menstrual cups are reusable and some brands can last 10 years, hellooooo savings!

They are super comfortable, since they don’t absorb your vaginal moisture along with your flow (dammit, TAMPONS)

In some cases they reduce cramps and leave you with a lighter period, score!

They can go 12 hours before needing to be emptied (of course on heavy days they may need to be emptied more frequently)

No gross smell (stupid PADS)

Can be worn swimming, running, sleeping, jumping and generally any other activity you can think of EXCEPT during intercourse.

Won’t leave behind icky cotton fibers in your vagina (die TAMPONS die)

Most come in 2 sizes (before children and after children) to ensure the perfect fit

The Cons:

There is a learning curve – unlike tampons or pads, a cup takes a bit longer to get the hang of and in some cases you may need to try several different brands before you find one that works best for you.

They have more of an upfront cost ranging anywhere from $20-$40 per cup-  but since they’re reusable, they actually save you money in the long run.  AND many companies will refund your money or send you a different size if one isn’t working for you.  So really it’s a risk free investment.

Emptying your cup in a public restroom takes a little forethought, but it’s really not that complicated.  All it involves it bringing a water bottle with you or a cleansing wipe, but really since they can be worn for so long, you can usually plan your day accordingly without ever having to empty it in public.

IMG_7572

Sckoon – punch down fold

IMG_7574

Sckoon – C fold

IMG_7555

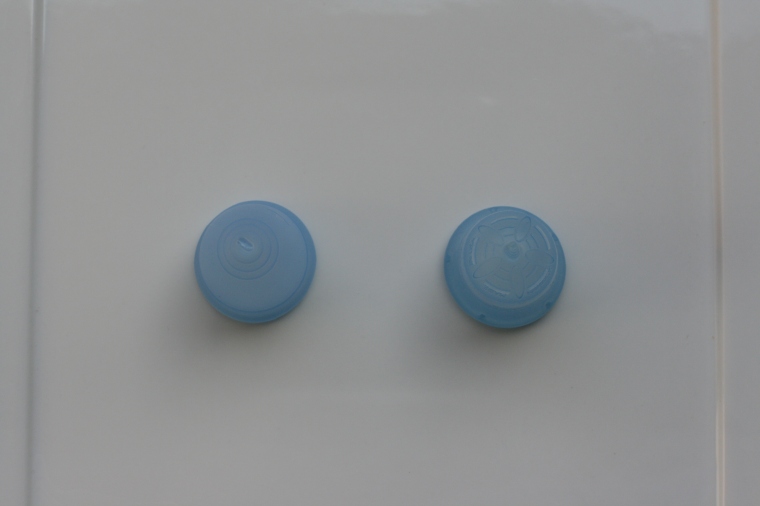
Top view – L: Lunette – R: Sckoon

IMG_7556

Left: Lunette – Right: Sckoon

IMG_7557

Lunette side view. You can see the seem if you look closely. Also note the lip and suction hole placement.

IMG_7559

Sckoon side view. Note the diagonal suction holes to allow for maximum capacity.

IMG_7562

They come with pretty storage bags!

IMG_7563

Sckoon, bottom view. Awww, it has a pretty yet functional flower grip pattern.

IMG_7564

Lunette, bottom view. Note the stem has been trimmed.

IMG_7566

Left: Sckoon – Right: Lunette. Note the Sckoon had a slightly wider rim.

IMG_7568

Sckoon top view

————–

So there you have it.  Try a cup and thank me later.

To purchase:

http://www.sckooncup.com/

http://www.lunette.com/store/index.php

http://www.amazon.com/s/ref=nb_sb_noss_1?url=search-alias%3Daps&field-keywords=menstrual%20cup&sprefix=menstru%2Caps&rh=i%3Aaps%2Ck%3Amenstrual%20cup

Filed Under: Health, My life, Product review Tagged With: blood, diva cup, lunette cup, menstrual cup, menstrual flow, menstruation, periods, product review, sckoon cup

Recipe: Sun-dried Tomato, Mushroom, and Spinach Tofu Quiche – Oh She Glows

January 17, 2014 by lauren.anvari@gmail.com Leave a Comment

IMG_7538

IMG_7539

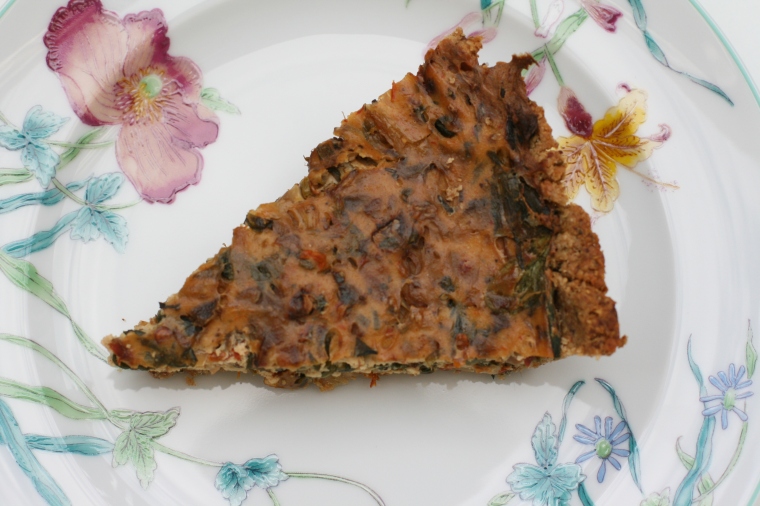
I found this recipe on Oh She Glows and let me tell you, it is a keeper!  I LOVED quiche and I must say that it was something I was a bit sad to see go once I adopted this plant based diet, but not anymore!  This quiche tastes so delicious, I’m convinced no one would be able to tell the difference.  I only very slightly altered Angela’s original recipe depending on what I had on hand.  My version is below, but if you should definitely check out her version, because I can only imagine that it’s even better!  The crust is so rustic and nutty, it perfectly compliments the delectable quiche filling.  I’m so looking forward to experimenting with different renditions of this quiche!

Ingredients:

FOR THE CRUST:
  • 1 tablespoon ground flax + 3 tablespoons water, mixed together
  • 1/2 cup almond meal
  • 1/2 cup ground walnuts
  • 1 cup rolled oats, ground into flour
  • 1 teaspoon dried parsley
  • 1 teaspoon dried oregano
  • 1/2 tsp kosher salt
  • 1 tbsp olive oil
  • 1-2.5 tbsp water, as needed
FOR THE QUICHE:
  • 1 block (14-oz) firm tofu
  • 1 tablespoon olive oil
  • 1 leek or yellow onion, thinly sliced
  • 3 large garlic cloves, minced
  • 3 cups (8-oz) sliced cremini mushrooms
  • 1/2 cup fresh green onions or chives, finely chopped
  • 1/2 cup fresh basil leaves, finely chopped
  • 1/3 cup oil-packed sun-dried tomatoes, finely chopped
  • 1 cup baby spinach
  • 2 tbsp nutritional yeast
  • 1 teaspoon dried oregano
  • 3/4-1 teaspoon fine grain sea salt
  • Black pepper, to taste
  • Red pepper flakes, to taste

Directions:

  1. Preheat oven to 350F and lightly grease a round 10-inch tart pan. Alternatively, you can use a 9-inch glass pie dish if desired.
  2. Wrap rinsed tofu in a few tea towels. Place a few books on top of it to lightly press out the water while you prepare the crust.
  3. For the crust: Whisk together flax and water mixture in a small bowl and set aside so it can gel up.
  4. In a large bowl, stir together the almond meal, oat flour (or buckwheat flour), parsley, oregano, and salt.
  5. Add in the flax mixture and oil. Stir until mostly combined, adding the remaining water until the dough is sticky (about the consistency of cookie dough). The dough should stick together when you press it between your fingers.
  6. Crumble the dough evenly over the base of the tart pan (or pie dish). Starting from the center of the pan, press the mixture evenly into the pan, working your way outward and up the sides of the pan. Poke a few fork holes in the dough so air can escape.
  7. Bake the crust at 350F for 13-16 minutes, or until lightly golden and firm to touch. Set aside to cool while you finish preparing the filling. Increase oven temperature to 375F.
  8. For the filling: Break apart the tofu block into 4 pieces and add into food processor. Process the tofu until smooth and creamy. If it doesn’t get creamy, add a tiny splash of almond milk to help it along.
  9. In a skillet, add oil and saute the onion and garlic over medium heat for a few minutes. Stir in the mushrooms, season with salt, and cook on medium-high heat until most of the water cooks off the mushrooms, about 10-12 minutes. Stir in the green onions, basil, sun-dried tomatoes, spinach, nutritional yeast, oregano, salt, pepper, and red pepper flakes until combined. Cook until the spinach is wilted.
  10. Finally, remove from heat and stir in the processed tofu until thoroughly combined. Adjust seasoning to taste if desired. Spoon mixture into baked crust and smooth out with a spoon until even.
  11. Bake quiche, uncovered, at 375F for 33-37 minutes, until the quiche is firm to the touch. For best results, cool the quiche for 15-20 minutes on a cooling rack before attempting to slice. The crust may crumble slightly when sliced warm, but not to worry.
  12. Wrap up leftovers and refrigerate for 3-4 days. Leftover quiche can be reheated in the oven on a baking sheet for about 15-20 minutes at 350F.

You can find the original recipe, here.

Enjoy!

Filed Under: Recipe Tagged With: plant based, quiche, sugar free, tofu, vegan

  • « Previous Page
  • 1
  • …
  • 5
  • 6
  • 7
  • 8
  • 9
  • …
  • 16
  • Next Page »

about

follow/contact

  • Email
  • Facebook
  • Instagram
  • Tumblr
  • Twitter
  • YouTube

categories

Copyright © 2025 · Foodie Pro Theme by Shay Bocks · Built on the Genesis Framework · Powered by WordPress