Lauren on Living

A Lifestyle Blog about Simplifying Healthy Living

  • Home
  • Health
  • My life
  • Recipes
  • Hire Me

Erika’s Big Ol’ Bowl of Oats

July 21, 2015 by lauren.anvari@gmail.com Leave a Comment

IMG_8893 IMG_8894Our friend Erika is something of a health foodie. She’s awesome and for as long as we have known her she has made a big ‘ol bowl of oats for breakfast that leaves the whole kitchen smelling divine. Her base of oats, peanut butter and banana pretty much always stays the same, but then she adds all kinds of delightful ingredients that really takes oatmeal to the next level. It’s hearty, delicious, super nutritious and sure to pack an energy punch that will keep you going for hours. Not to mention, these oats are also a great galactagogue food for all the breastfeeding mamas out there! I begged one of her main go-to recipes off her and was surprised to discover that it’s actually incredibly quick and easy to make. Tasty? Check. Healthy? Check. Easy? Check. Toddler approved? Double check. What’s not to love about that?

Serving size: 1

Ingredients:

– 1 cup of unsweetened plain almond milk

– 2 tbsp water

– 1/2 – 1 whole apple, peeled and diced

– 1/8 cup raisins

– Cinnamon, to taste

– 1/2 cup oats

– 1 tbsp chia seeds

– 1 banana, chopped

– 1 tbsp peanut butter

Directions:

Put the almond milk, water, apple, raisins and cinnamon into a medium sized pot and bring to a boil. Then add the oats and turn the heat to low and let simmer for 3-5 minutes. Add the chia seeds, banana and peanut butter, mix well and let simmer for 1 minute. Remove from heat and add a bit more almond milk to give it a really creamy texture.

Optional Toppings:

Sunflower seeds

Pumpkin seeds

Variations:

Sub out the apples and raisins for any other fruit combo you want. Peaches and shredded coconut perhaps? Pureed pumpkin, with almond butter (instead of peanut butter) and pumpkin pie spice for a delicious fall breakfast. Berries, coca powder, dried cranberries, topped with chocolate chips anyone? Just get creative people!

IMG_8896 IMG_8901

Filed Under: Recipe Tagged With: breakfast, easy, galactagogue, healthy, lactation, nutritious, oatmeal, oats, plant based, quick, recipe, vegan

Recipe: Calico Baked Beans

July 8, 2015 by lauren.anvari@gmail.com Leave a Comment

IMG_8626This recipe is straight out of my childhood.  It’s a crowd-pleaser and a potluck go to.  This is the perfect summer time cook out dish.  My mom made this quite a lot when we were kids and a while back I pleaded the recipe off her and now I share it with you.  It’s so good.  Eating it instantly brings me back to hot summer days at the beach while being buffeted by salty ocean breezes.  This is a definite staple in our house because it is just so delicious!

Ingredients: 

1 large chopped onion

1 16 oz can vegetarian baked beans – DO NOT DRAIN

1 16 oz can kidney beans -DO NOT DRAIN

1 16 oz can butter beans or cannellini beans or baby lima beans or any light colored canned bean really -DO NOT DRAIN

1/2 cup ketchup

1/4 cup brown sugar

1 tsp spicy brown mustard

olive oil (optional)

Variations:

A great thing about this recipe is that you can really play with it and make it your own.

I usually add an extra 16 oz can of vegetarian baked beans as well as a 16 oz can of black beans just to give it more bulk and to add another color. You can also adjust the ketchup and mustard amounts depending on whether you prefer it on the sweet or savory side. I have even been known to substitute the brown sugar for molasses or just to omit it all together.

Directions:

Preheat the oven to 350 degrees Fahrenheit.

Brown the onions with a bit of olive oil in a dutch oven over medium heat.  Once the onions are ready, add the rest of the ingredients and stir until well combined.  Cover and bake in the oven for 1 hour.

Enjoy!

IMG_8634 IMG_8635 IMG_8637

Filed Under: Recipe Tagged With: baked beans, beans, cook out, easy, plant based recipe, potluck, recipe, simple recipe, vegan

Recipe: Berry Garcia Durian Ice Cream

May 1, 2015 by lauren.anvari@gmail.com Leave a Comment

FullSizeRender (1)When it comes to durian, the pungent aroma is the main barrier to loving this sweet custard flavored fruit. And let me tell you it is a HUGE barrier. It does not smell good. Not at all. But it really is the perfect vehicle for homemade raw vegan ice cream. It doesn’t melt the same way frozen banana ice cream does and it is SUPER creamy.

For this recipe I decided on a twist on the classic Cherry Garcia flavor, mainly because mixed berries were what I had on hand. This is a great treat for toddlers, because they totally think they’re eating something indulgent when it’s really just fruit.

If you don’t live somewhere tropical where you can get fresh durian and jack fruit, you can find them frozen at most asian grocery stores. I got mine at H-Mart.

Ingredients:

1 pound (about 2-3 cups) of frozen durian, chopped (seedless is easiest, but any will do)

1/2 cup frozen mixed berries

2 frozen jackfruit pods, chopped (about 1/4 cup)

1 tsp vanilla flavor (I used Trader Joes’ alchohol free)

1/4 cup of carob chips

Directions:

Allow all the frozen fruit to sit out for a bit until it thaws just slightly and is a little soft (this makes blending so much easier). Blend all the ingredients except the carob chips in a food processor until creamy and smooth. Add the carob chips and pulse until they are chopped up a bit and mixed throughout. Serve and enjoy immediately!

FullSizeRenderDurian ice cream is great for experimenting with ingredients and flavors. Next time, I’m definitely going to make a mint chocolate chip using fresh mint, YUM!

Side note: Be sure to throw out the durian wrappers ASAP or your whole house will smell like the stuff. I made the mistake of taking a nap before properly disposing of the packaging in a sealed bag and I woke up to the smell and it was STRONG. Oh well, nothing a scented candle can’t fix!

Filed Under: Recipe Tagged With: durian, durian ice cream, frozen durian, frozen jack fruit, homemade, ice cream, raw, recipe, vegan

Recipe: Portobello Mushroom & Walnut Loaf Muffins

January 3, 2014 by lauren.anvari@gmail.com 2 Comments

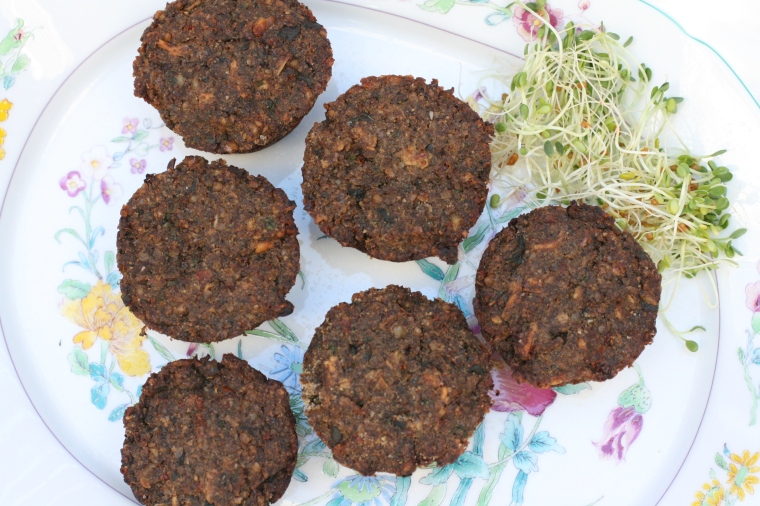
IMG_7394

IMG_7397

After a long day with a less than pleasant small human, I needed to whip something up quickly for dinner. So I took to the refrigerator and started throwing things into my tiny (almost broken, on its last legs) food processor and this is what I came up with.  Luckily, I had a sense that this dish would be a keeper so I kept track of the measurements and amounts along the way in the hopes that one day I may be able to recreate these delicious muffins.  They are packed with veggies, and oh so good, while being good for you.  That’s a win-win in my book!

Ingredients:

4 portobello mushroom caps

1 cup walnuts

1/2 cup nutritional yeast

3 celery stalks

1 onion

1 large garlic clove

7 sun dried tomatoes (the kind found in oil)

1/3 cup fresh basil – finely chopped

1 tsp tarragon

1 tsp sage

1 tsp oregano

1/2 tsp kosher salt

1 pinch of cayenne pepper

1 pinch of cumin powder

1 1/2 cups bread crumbs (with extra on hand)

French fried onions – optional

Directions:

Chop the portobello mushrooms and then mince them in a food processor until they reach a finely chopped, almost paste like consistency.  Move the mushroom paste to a large mixing bowl.  Place the walnuts and nutritional yeast in the food processor and once they are finely chopped add them to the mushroom paste.

Finely chop the onion, celery, garlic and sun dried tomatoes in a food processor.  Saute this mixture with some olive oil over medium high heat.  Add the tarragon, sage, oregano, cumin, cayenne and salt.  Once the vegetables are tender add them to the bowl containing the mushroom and walnut mixture and mix together well.  Add the bread crumbs and continue to mix until well combined.  The mixture should be sticking together and becoming quite thick and mold-able, if you find that it’s still too wet add more bread crumbs until you reach the desired consistency.  Stir in crumbled french fried onions if you wish.

Scoop the mixture into well greased muffin tins and bake at 350 degrees Fahrenheit for 30 minutes or until cooked through.

Note:  These would be particularly nice with a vegetable gravy.

Enjoy!

*Note: These make great left overs.  You can reheat them or even put them in a sandwich.  I definitely think I’ll be adding these to my Thanksgiving line up.  So good!*

*Any in case any of you are wondering, that gorgeous platter that the loaf muffins are on is by Mottahedeh.*

Filed Under: Recipe Tagged With: loaf, mottahedeh, muffin, nutritional yeast, portobello mushrooms, recipe, savory, sun dried tomatoes, vegan, walnuts

Recipe: Veggie Cutlet

December 29, 2013 by lauren.anvari@gmail.com 1 Comment

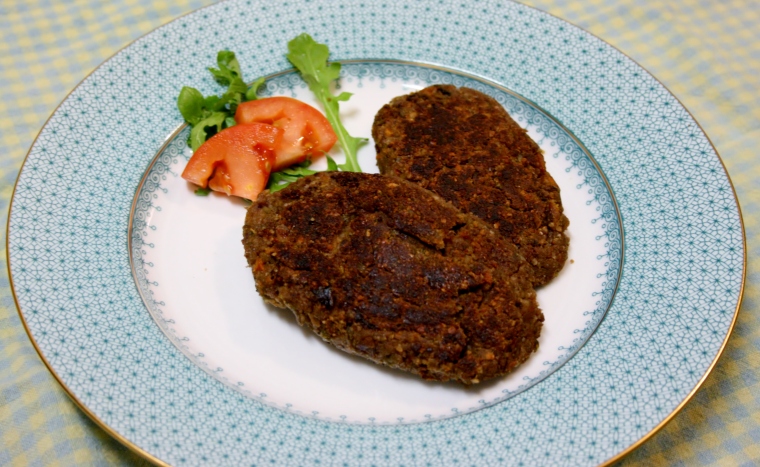
IMG_7383

When we were in Texas for Thanksgiving with Raf’s family, his aunt Minoo made these delicious veggie cutlets (or kotlets if you’re Persian).  They were so good and had such a nice texture that I had to ask several times if she was sure there wasn’t any meat in them.  Well she generously shared her recipe with me and I finally got around to making them.  Mine didn’t turn out quite as good as hers did but that’s probably because I was a bit liberal with my proportions, nonetheless they were still a hit.  Some of the ingredients may be a bit tricky to track down, but I was able to find everything I needed at my local Asian super market.  This recipe isn’t hard to make but there are a few food prep steps involved so a food processor will be your best friend.

Enjoy!

Ingredients:

1 Medium potato, cooked and mashed

1 carrot (shredded)

1/2 cup mashed peas

1/2 cup shredded cabbage

1 tsp ginger paste

1 tbsp garlic paste

1 serrano chili minced or 1 1/2 tsp chili sauce

1 tsp dried mango powder (amchur)

2 tsp chaat masala (I didn’t have any so, I used garam masala instead)

3 tbsp roasted chick pea flour (besan)

1 cup ground cashews and almonds (I didn’t have almonds, so I used walnuts instead, improvise people!)

Salt and Pepper to taste

olive oil for cooking – if using the frying method

Directions:

Sautee the garlic and ginger pastes in a skillet with a bit of olive oil.  Add the mashed potato, carrot, mashed peas and cabbage and stir fry until soft.  Add the mango powder, chaat masala, chili and chick pea flour and stir until combined.  Stir in the ground nuts and add the salt and pepper.  Allow the mixture the cook for a few minutes stirring gently (it will have a very thick consistency).  Remove the mixture from heat and allow to cool, until it is safe to handle with bare hands.

Once the mixture has cooled, scoop out small amounts and shape into oval patties.  You can either fry or bake the patties.

Frying:  Heat olive oil in a skillet, and cook patties on medium heat (turning often) until they are golden brown.

Baking:  Preheat the oven to 400 degrees Fahrenheit, place patties on a baking sheet lined with parchment paper and bake for 30 minutes. Make sure to flip the patties half way through.

Filed Under: Recipe Tagged With: amchur, besan, chick peas, garbanzo beans, kotlet, recipe, vegan, vegetarian, veggie cutlet

Recipe: Rich Chocolate Cake & Creamy Chocolate Icing

December 13, 2013 by lauren.anvari@gmail.com Leave a Comment

IMG_7230

IMG_7227

I’m just going to come right out and tell you that this cake is sugar free, dairy free, gluten free, soy free, paleo and vegan. I know, I know,  you’re thinking, ‘how can it possibly taste good?!’  But trust me, this cake is absolutely delicious and tastes completely decadent.

Rafaan and I don’t give Asher any sugar but I always thought he’d have his first sugary treat on his birthday, however Raf thought it wasn’t necessary and that Asher wouldn’t even miss it and I must say I had to agree.  I still wanted him to have a birthday cake though, so I set out trying to find a recipe that was sugar free AND vegan. Well, I came across this sugar free cake recipe and this icing recipe (both of which are by Lea at Paleo Spirit) which I then tweaked a bit to make vegan and to suit my palate.  It wasn’t my intention to have the cake be gluten free, soy free or paleo, but I really like that it is, because I’m happy knowing that pretty much anyone and everyone can eat this cake, no matter their dietary restrictions.

I was so proud of this cake and I was so excited to watch Asher gobble it up and get his face covered in chocolate, but alas the poor guy wasn’t feeling up to it.  I stupidly scheduled his 12 month check up on his actual birthday and he had two vaccines and a hemoglobin test, which required a finger prick, so he wasn’t feeling well and only took a few bites (he did gobble it up the next day though).  Raf and I, loved it!  Raf, being the sweetie that he is, even raved that I should open up a bakery.  The cake had a dense, rich, slightly fudge like consistency and had just the right amount of sweetness.  The coolest part though, was the icing. I mean, come on, chocolate icing made out of avocado sounds too good to be true, but it was incredible!  It was rich and creamy and oh so delicious.  Every once in a while I could taste a hint of avocado (although Raf couldn’t), which may have been due to the fact that I knew it was there or perhaps I didn’t mix it enough, but otherwise it tasted exactly like rich chocolate icing.  I used 1/2 a cup of maple syrup, but next time I think I’ll try using less.  I suggest not telling people what the icing is made out of and then shocking them once they try it. They will not believe the truth because it’s that good!

I just love how guilt free and healthy this cake is!

Enjoy!

Chocolate Cake Ingredients:

  • 10 medjool dates, pitted & chopped
  • 1 cup of unsweetened applesauce
  • 1 1/2 bananas, mashed
  • 1/2 cup coconut oil
  • 2 teaspoons vanilla extract
  • 1/2 cup coconut flour
  • 1/2 cup unsweetened cocoa powder
  • 1 teaspoon baking soda
  • 1/2 teaspoon kosher salt
  • 1/2 cup strong brewed coffee
  • Cardamom to taste (optional) – in my experience, less is more when it comes to cardamom, I used about 1/4 teaspoon

Instructions

  1. Put the dates, apple sauce and bananas in a food processor and puree until smooth.
  2. Move the banana, applesauce and date mixture to a large mixing bowl , add the vanilla extract, coconut oil and coffee and mix with a hand mixer until well combined.
  3. Combine the dry ingredients in a separate bowl.
  4. Add the dry ingredients into the wet ingredients and mix on a low speed, until  smooth.
  5. Grease a 9 inch round cake pan with coconut oil and cover the bottom of the pan with parchment paper.
  6. Pour the batter into the greased pan and smooth it out.
  7. Bake at 350 degrees for 35-40 minutes or until a cake tester (or fork) comes out clean when stuck into the middle.
  8. Allow the cake to cool before turning over onto a flat surface.

———-

Chocolate Frosting Ingredients:

  • 1 perfectly ripe avocado, chopped (I used organic)
  • 1/2 cup unsweetened cocoa powder
  • 1/4 – 1/2 cup maple syrup, depending on how sweet you want it
  • Vanilla extract to taste

Instructions:

Place all three ingredients in a food processor and mix together, stopping to scrape down the sides whenever necessary. Spread immediately or refrigerate for later use (I spread it immediately).

———-

Decorative Cashew Cardamom Icing Ingredients: – skip this is you’re worried about someone having a nut allergy

  • Raw cashews
  • Water
  • Cardamom

Instructions:

Place cashews (I used about 3/4 cup and had plenty left over) in a food processor and process into a fine powder, with the processor still running slowly add water until you get a smooth creamy consistency (you don’t want it to be too runny).  Finally add the cardamom sparingly and mix until evenly distributed throughout.  Place your icing in a piping bag (or you could use a zip lock bag with a tiny hole cut into a corner like I did) and decorate your cake as desired.

IMG_7235

Filed Under: My life, Recipe Tagged With: avocado, cake, cardamom, cashew, chocolate, dairy free, first birthday cake, gluten free, healthy, icing, paleo, recipe, soy free, sugar free, sugarless, toddler cake, vegan

Recipe: Avocado Pie

July 22, 2013 by lauren.anvari@gmail.com Leave a Comment

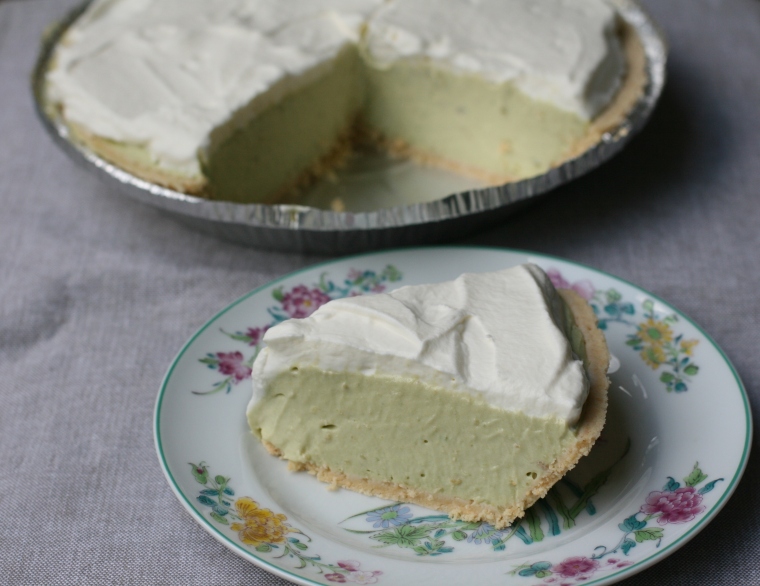
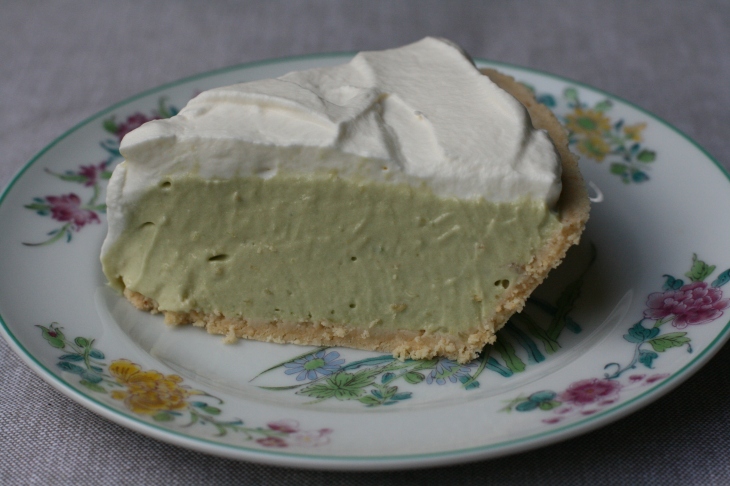
UPDATE: We adopted a plant based diet in September 2013 so, while this was definitely yummy, it no longer reflects the food we eat. IMG_6595

I know, I know, avocado pie sounds dreadful, but trust me on this, it’s actually quite nice and super easy to make.  You can even name it something else and leave people guessing as to what your secret ingredient is.  It’s reminiscent of a key lime pie and has always been a crowd-pleaser whenever I’ve made it (except for that one time when I added eggs and baked it, don’t do that) you can make it a bit healthier by leaving the cream cheese out, but be warned, the pie won’t maintain it’s form as well.  Try it and let me know what you think.

Ingredients:

Crust:

1 ready made cracker crust, graham cracker or short bread (you could make your own, but I generally go for the quicker route)

Filling:

2 medium ripe hass avocados – scoop out and chop up the flesh

1 8-ounce package cream cheese (room temperature)

1 14-ounce can sweetened condensed milk

3 limes -juiced

1 lemon – juiced

Pinch of salt

Garnish (optional):

Heavy whipping cream

Sugar – to taste

Directions:

In a large bowl mix together the avocado and cream cheese until smooth, using an electric mixer.  Mix in the condensed milk, lime juice, lemon juice and salt until creamy.  Try to keep the avocado lumps to a minimum.  Scoop into the pie crusts and chill in the refrigerator for at least 4 hours or over night.

Put the heavy whipping cream and desired amount of sugar in a separate bowl and beat until fluffy and soft peaks form.

Garnish the pie with the whipped cream and serve.  Enjoy!

IMG_6590

Filed Under: Recipe Tagged With: avocado, avocado pie, cooking, creamy tangy pie, delicious pie, dessert, easy dessert, food, no bake pie, pie, recipe, unexpected

Recipe: Pecan Pie

May 20, 2013 by lauren.anvari@gmail.com Leave a Comment

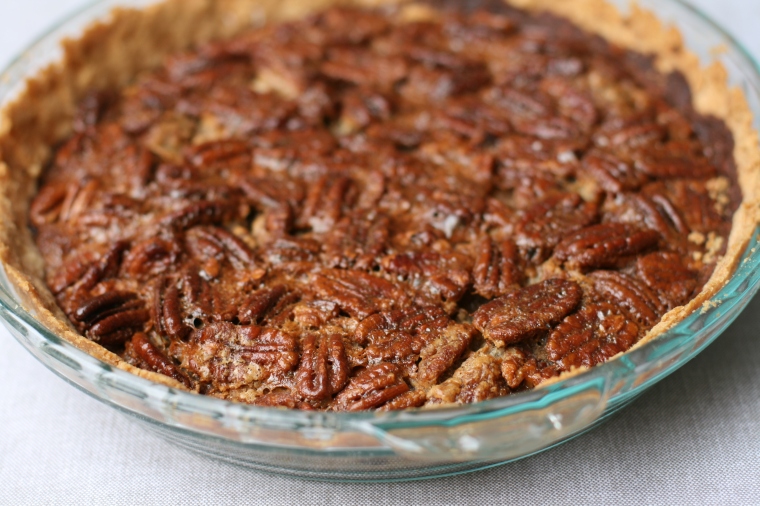
UPDATE: We adopted a plant based diet in September 2013 so, while this was definitely yummy, it no longer reflects the food we eat. IMG_5921

IMG_5923

This recipe is super easy to make and only takes about 5 to 10 minutes to prepare once you get the hang of it.  This pie is not as sweet as most pecan pies that I’ve come across, but that’s what my husband loves most about it.

Ingredients:

Crust:

1 cup flour

1/4 cup vegetable oil

3 tbsp milk

Filling:

3 eggs (lightly beaten with a fork)

1/2 cup karo light corn syrup

1/2 cup sugar

pinch of salt to taste

1 1/2 cups pecans

2 tbsp butter (cut up into smallish pieces)

Directions:

Preheat oven to 350 degrees Fahrenheit

Crust:

Mix the flour, oil and milk together until all liquid is absorbed.  You want the consistency to be like play dough, so add a bit more milk and oil to get it there if need be (I forgot this step and my crust was rather dry and crumbly, just saying).  You should mix as little as possible so as soon as there is an even consistency, stop mixing.

Using your fingers, press the dough into a pie pan, making sure to go up the sides, until it is evenly distributed,

Filling:

Mix the eggs, sugar, corn syrup, salt, pecans and butter together in a large bowl, then pour into the pie crust and bake for 50 minutes.

Let cool, then serve with a dollop of whipped cream or vanilla ice cream and enjoy.

Filed Under: Recipe Tagged With: baking, cooking, dessert, easy, pecan, pecan pie, pie, quick, recipe

Recipe: Lentil Loaf

May 13, 2013 by lauren.anvari@gmail.com Leave a Comment

UPDATE: We adopted a plant based diet in September 2013 so, while this was definitely yummy, it no longer reflects the food we eat. photo (17)

Raf and I have decided that we’re going to be domestic pescatarians (we don’t eat land meat when we’re at home), so I have been  looking for easy recipes that are delicious and packed full of protein.  I adapted this recipe from my mother’s meat loaf recipe and it’s super simple and quick, especially if you cook the lentils the day before like I did.  Plus lentils and rice together make a complete protein.

Ingredients:

1 cups green lentils

1 cup red lentils

10 oz cooked brown rice (I used Trader Joe’s precooked brown rice, which can be found in the freeze isle)

1 envelope onion soup mix

1  cup bread crumbs

3 eggs

1/2 cup tomato ketchup

Directions:

Preheat over to 400 degrees Fahrenheit   Boil lentils until tender ~ 40 minutes.  Put lentils in a large bowl and mash slightly, add rice, soup mix, bread crumbs, eggs, and ketchup and mix together.  Put mixture into a greased loaf pan, top with additional ketchup and bake for 40 minutes.  Serve and enjoy!

Filed Under: Recipe Tagged With: lentil, lentil loaf, meat loaf, pescatarian, recipe, vegetarian

Recipe: Happy Thanksgiving!

November 22, 2012 by lauren.anvari@gmail.com Leave a Comment

UPDATE: We adopted a plant based diet in September 2013 so, while this was definitely yummy, it no longer reflects the food we eat.

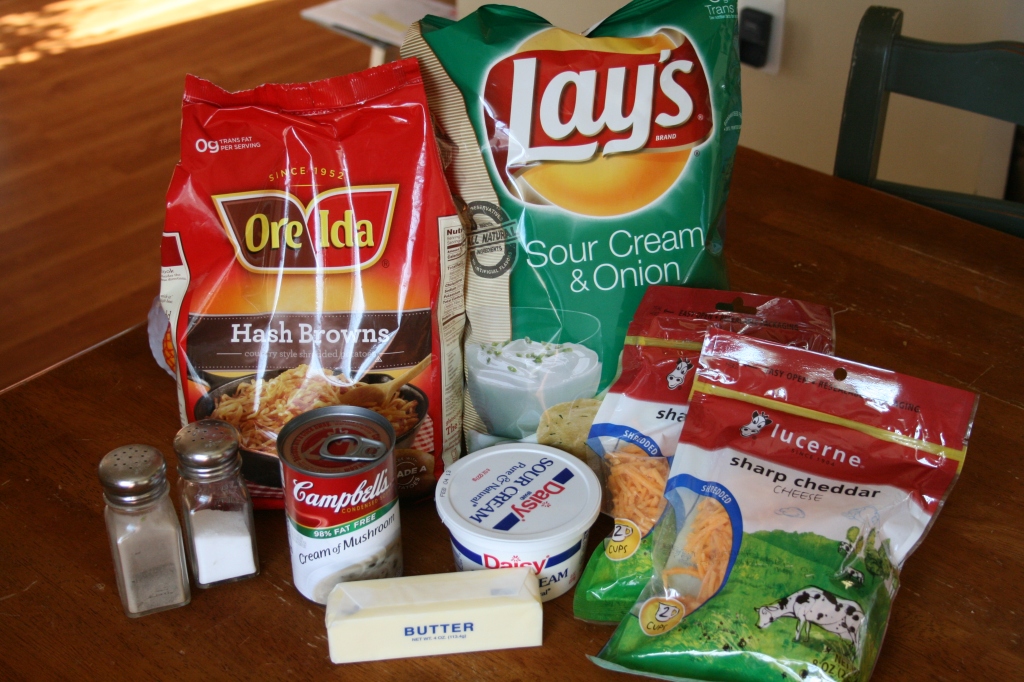
I hope you all have a wonderful Thanksgiving holiday and eat lots of delicious food.   Raf and I will be spending the holiday with my Aunt and Uncle in Baltimore, and I can’t wait to stuff my face!  Raf’s mom makes a cheesy potato casserole that Raf absolutely loves and it was his only menu item request this year…as it has been every year.  So I’d thought I’d share the recipe with you.

Cheesy Potato Casserole Recipe

Ingredients:

1.5 pound bag of Hash browns (thawed)

8oz Sour cream

1 can Cream of Mushroom Soup

3 cups Shredded Sharp Cheddar Cheese

Salt and Pepper to Taste (go generous with the pepper)

2 Tbsp Butter, cut into small pieces

Sour Cream and Onion Chips, crumbled

Directions:

Preheat over to 350 degrees F.  Combine hash browns, sour cream, cream of mushroom soup, cheese, salt and pepper in a large casserole dish.  Mix well.  Top mixture with crumbled chips.  Top chips with pats of butter spaced evenly apart.  Bake for 25-30 minutes.

It’s that easy!  This is not the healthiest dish, but it’s SO good.  In any case it’s OK to indulge in moderation once in a while.

Gobble Gobble everyone!

Filed Under: My life, Recipe Tagged With: casserole, cheesy potato casserole, hash browns, holiday, recipe, Thanksgiving

about

follow/contact

  • Email
  • Facebook
  • Instagram
  • Tumblr
  • Twitter
  • YouTube

categories

Copyright © 2025 · Foodie Pro Theme by Shay Bocks · Built on the Genesis Framework · Powered by WordPress