Lauren on Living

A Lifestyle Blog about Simplifying Healthy Living

  • Home
  • Health
  • My life
  • Recipes
  • Hire Me

Recipe: Rich Chocolate Cake & Creamy Chocolate Icing

December 13, 2013 by lauren.anvari@gmail.com Leave a Comment

IMG_7230

IMG_7227

I’m just going to come right out and tell you that this cake is sugar free, dairy free, gluten free, soy free, paleo and vegan. I know, I know,  you’re thinking, ‘how can it possibly taste good?!’  But trust me, this cake is absolutely delicious and tastes completely decadent.

Rafaan and I don’t give Asher any sugar but I always thought he’d have his first sugary treat on his birthday, however Raf thought it wasn’t necessary and that Asher wouldn’t even miss it and I must say I had to agree.  I still wanted him to have a birthday cake though, so I set out trying to find a recipe that was sugar free AND vegan. Well, I came across this sugar free cake recipe and this icing recipe (both of which are by Lea at Paleo Spirit) which I then tweaked a bit to make vegan and to suit my palate.  It wasn’t my intention to have the cake be gluten free, soy free or paleo, but I really like that it is, because I’m happy knowing that pretty much anyone and everyone can eat this cake, no matter their dietary restrictions.

I was so proud of this cake and I was so excited to watch Asher gobble it up and get his face covered in chocolate, but alas the poor guy wasn’t feeling up to it.  I stupidly scheduled his 12 month check up on his actual birthday and he had two vaccines and a hemoglobin test, which required a finger prick, so he wasn’t feeling well and only took a few bites (he did gobble it up the next day though).  Raf and I, loved it!  Raf, being the sweetie that he is, even raved that I should open up a bakery.  The cake had a dense, rich, slightly fudge like consistency and had just the right amount of sweetness.  The coolest part though, was the icing. I mean, come on, chocolate icing made out of avocado sounds too good to be true, but it was incredible!  It was rich and creamy and oh so delicious.  Every once in a while I could taste a hint of avocado (although Raf couldn’t), which may have been due to the fact that I knew it was there or perhaps I didn’t mix it enough, but otherwise it tasted exactly like rich chocolate icing.  I used 1/2 a cup of maple syrup, but next time I think I’ll try using less.  I suggest not telling people what the icing is made out of and then shocking them once they try it. They will not believe the truth because it’s that good!

I just love how guilt free and healthy this cake is!

Enjoy!

Chocolate Cake Ingredients:

  • 10 medjool dates, pitted & chopped
  • 1 cup of unsweetened applesauce
  • 1 1/2 bananas, mashed
  • 1/2 cup coconut oil
  • 2 teaspoons vanilla extract
  • 1/2 cup coconut flour
  • 1/2 cup unsweetened cocoa powder
  • 1 teaspoon baking soda
  • 1/2 teaspoon kosher salt
  • 1/2 cup strong brewed coffee
  • Cardamom to taste (optional) – in my experience, less is more when it comes to cardamom, I used about 1/4 teaspoon

Instructions

  1. Put the dates, apple sauce and bananas in a food processor and puree until smooth.
  2. Move the banana, applesauce and date mixture to a large mixing bowl , add the vanilla extract, coconut oil and coffee and mix with a hand mixer until well combined.
  3. Combine the dry ingredients in a separate bowl.
  4. Add the dry ingredients into the wet ingredients and mix on a low speed, until  smooth.
  5. Grease a 9 inch round cake pan with coconut oil and cover the bottom of the pan with parchment paper.
  6. Pour the batter into the greased pan and smooth it out.
  7. Bake at 350 degrees for 35-40 minutes or until a cake tester (or fork) comes out clean when stuck into the middle.
  8. Allow the cake to cool before turning over onto a flat surface.

———-

Chocolate Frosting Ingredients:

  • 1 perfectly ripe avocado, chopped (I used organic)
  • 1/2 cup unsweetened cocoa powder
  • 1/4 – 1/2 cup maple syrup, depending on how sweet you want it
  • Vanilla extract to taste

Instructions:

Place all three ingredients in a food processor and mix together, stopping to scrape down the sides whenever necessary. Spread immediately or refrigerate for later use (I spread it immediately).

———-

Decorative Cashew Cardamom Icing Ingredients: – skip this is you’re worried about someone having a nut allergy

  • Raw cashews
  • Water
  • Cardamom

Instructions:

Place cashews (I used about 3/4 cup and had plenty left over) in a food processor and process into a fine powder, with the processor still running slowly add water until you get a smooth creamy consistency (you don’t want it to be too runny).  Finally add the cardamom sparingly and mix until evenly distributed throughout.  Place your icing in a piping bag (or you could use a zip lock bag with a tiny hole cut into a corner like I did) and decorate your cake as desired.

IMG_7235

Filed Under: My life, Recipe Tagged With: avocado, cake, cardamom, cashew, chocolate, dairy free, first birthday cake, gluten free, healthy, icing, paleo, recipe, soy free, sugar free, sugarless, toddler cake, vegan

Recipe: Avocado Pie

July 22, 2013 by lauren.anvari@gmail.com Leave a Comment

UPDATE: We adopted a plant based diet in September 2013 so, while this was definitely yummy, it no longer reflects the food we eat. IMG_6595

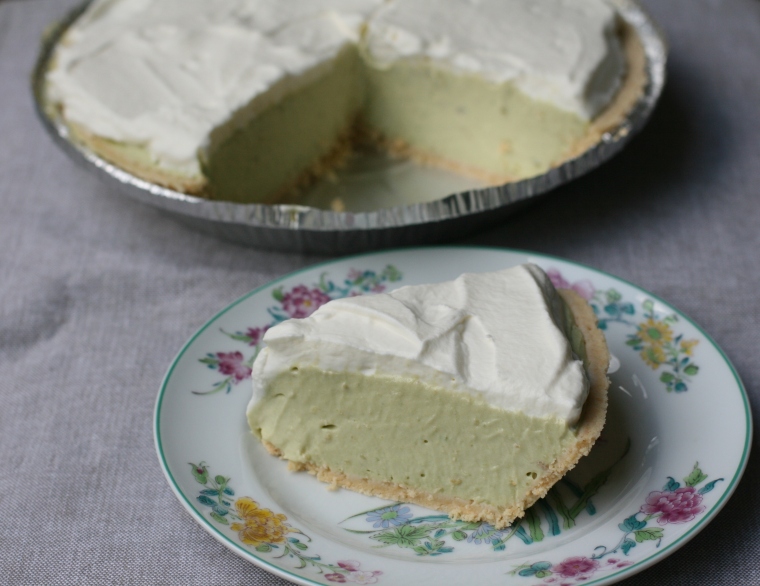
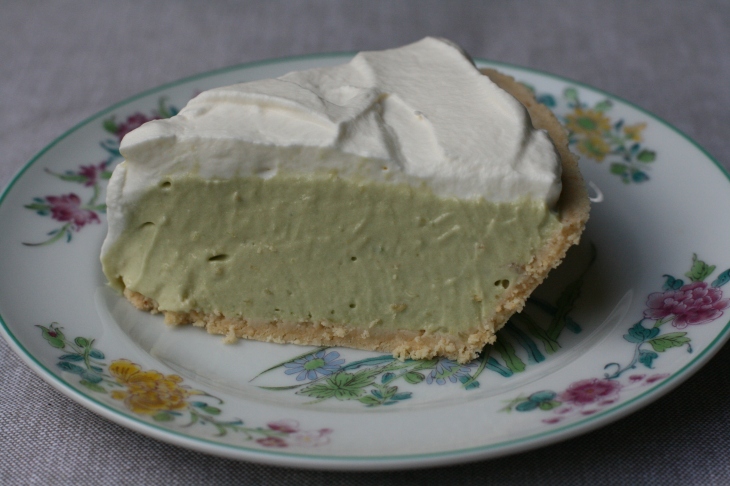
I know, I know, avocado pie sounds dreadful, but trust me on this, it’s actually quite nice and super easy to make.  You can even name it something else and leave people guessing as to what your secret ingredient is.  It’s reminiscent of a key lime pie and has always been a crowd-pleaser whenever I’ve made it (except for that one time when I added eggs and baked it, don’t do that) you can make it a bit healthier by leaving the cream cheese out, but be warned, the pie won’t maintain it’s form as well.  Try it and let me know what you think.

Ingredients:

Crust:

1 ready made cracker crust, graham cracker or short bread (you could make your own, but I generally go for the quicker route)

Filling:

2 medium ripe hass avocados – scoop out and chop up the flesh

1 8-ounce package cream cheese (room temperature)

1 14-ounce can sweetened condensed milk

3 limes -juiced

1 lemon – juiced

Pinch of salt

Garnish (optional):

Heavy whipping cream

Sugar – to taste

Directions:

In a large bowl mix together the avocado and cream cheese until smooth, using an electric mixer.  Mix in the condensed milk, lime juice, lemon juice and salt until creamy.  Try to keep the avocado lumps to a minimum.  Scoop into the pie crusts and chill in the refrigerator for at least 4 hours or over night.

Put the heavy whipping cream and desired amount of sugar in a separate bowl and beat until fluffy and soft peaks form.

Garnish the pie with the whipped cream and serve.  Enjoy!

IMG_6590

Filed Under: Recipe Tagged With: avocado, avocado pie, cooking, creamy tangy pie, delicious pie, dessert, easy dessert, food, no bake pie, pie, recipe, unexpected

Recipe: Pecan Pie

May 20, 2013 by lauren.anvari@gmail.com Leave a Comment

UPDATE: We adopted a plant based diet in September 2013 so, while this was definitely yummy, it no longer reflects the food we eat. IMG_5921

IMG_5923

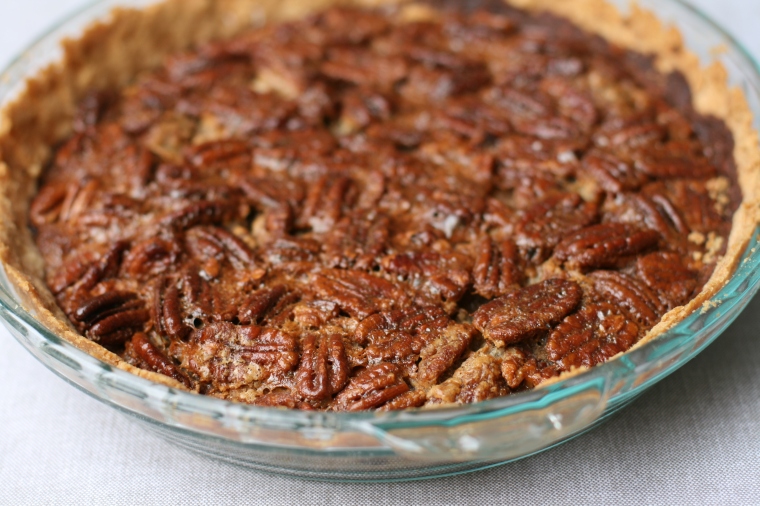
This recipe is super easy to make and only takes about 5 to 10 minutes to prepare once you get the hang of it.  This pie is not as sweet as most pecan pies that I’ve come across, but that’s what my husband loves most about it.

Ingredients:

Crust:

1 cup flour

1/4 cup vegetable oil

3 tbsp milk

Filling:

3 eggs (lightly beaten with a fork)

1/2 cup karo light corn syrup

1/2 cup sugar

pinch of salt to taste

1 1/2 cups pecans

2 tbsp butter (cut up into smallish pieces)

Directions:

Preheat oven to 350 degrees Fahrenheit

Crust:

Mix the flour, oil and milk together until all liquid is absorbed.  You want the consistency to be like play dough, so add a bit more milk and oil to get it there if need be (I forgot this step and my crust was rather dry and crumbly, just saying).  You should mix as little as possible so as soon as there is an even consistency, stop mixing.

Using your fingers, press the dough into a pie pan, making sure to go up the sides, until it is evenly distributed,

Filling:

Mix the eggs, sugar, corn syrup, salt, pecans and butter together in a large bowl, then pour into the pie crust and bake for 50 minutes.

Let cool, then serve with a dollop of whipped cream or vanilla ice cream and enjoy.

Filed Under: Recipe Tagged With: baking, cooking, dessert, easy, pecan, pecan pie, pie, quick, recipe

Recipe: Lentil Loaf

May 13, 2013 by lauren.anvari@gmail.com Leave a Comment

UPDATE: We adopted a plant based diet in September 2013 so, while this was definitely yummy, it no longer reflects the food we eat. photo (17)

Raf and I have decided that we’re going to be domestic pescatarians (we don’t eat land meat when we’re at home), so I have been  looking for easy recipes that are delicious and packed full of protein.  I adapted this recipe from my mother’s meat loaf recipe and it’s super simple and quick, especially if you cook the lentils the day before like I did.  Plus lentils and rice together make a complete protein.

Ingredients:

1 cups green lentils

1 cup red lentils

10 oz cooked brown rice (I used Trader Joe’s precooked brown rice, which can be found in the freeze isle)

1 envelope onion soup mix

1  cup bread crumbs

3 eggs

1/2 cup tomato ketchup

Directions:

Preheat over to 400 degrees Fahrenheit   Boil lentils until tender ~ 40 minutes.  Put lentils in a large bowl and mash slightly, add rice, soup mix, bread crumbs, eggs, and ketchup and mix together.  Put mixture into a greased loaf pan, top with additional ketchup and bake for 40 minutes.  Serve and enjoy!

Filed Under: Recipe Tagged With: lentil, lentil loaf, meat loaf, pescatarian, recipe, vegetarian

Recipe: Quinoa Salad

May 7, 2013 by lauren.anvari@gmail.com 1 Comment

quinoa salad

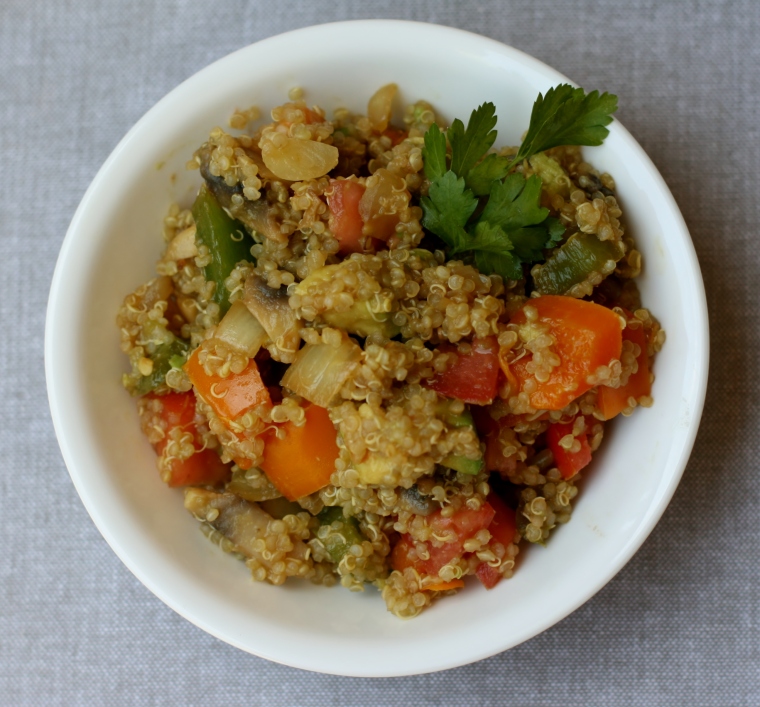
This is the perfect summer salad.  It can be served warm or cold and is delicious either way.  What I love about this dish is that it can be adapted to your individual tastes so easily.  You can really add anything you want, but in my opinion the creamy avocado really elevates this otherwise simple dish into something special.

Ingredients:

2 cups cooked quinoa – (looks best with red quinoa, I used white because that’s what I had on hand)

2 bell peppers – diced (I like to use different colored ones to make it visually appealing)

1 medium onion -diced

3-4 plum tomatoes – diced

5-7  mushrooms – diced

1 avocado – cubed

2 lemons (juiced)

1 tbsp olive oil

Sea salt to taste

Garlic powder to taste

Onion powder to taste

Soy sauce to taste

Garnish with fresh parsley (optional)

Directions:

Heat olive oil in a large skillet.  Add the bell pepper, onion, mushroom, garlic powder, onion powder and a little soy sauce.  Sauté the mixture until the onions and mushrooms are tender, then remove from heat.  In a large bowl gently mix the sauteed vegetables, quinoa, tomatoes and avocado together, then top with lemon juice, soy sauce and sea salt and mix some more.

There you have it.  This dish is so easy to make and has been a tried and true crowd-pleaser  in our circle.

Filed Under: Recipe Tagged With: avocado, bell pepper, cooking, easy cooking, food, mushrooms, onion, quinoa, recipes, salad, soy sauce, summer

Recipe: Hummus

May 1, 2013 by lauren.anvari@gmail.com Leave a Comment

Humms

This hummus was so easy and quick to make, I have no idea why I waited this long to make my own.

Ingredients:

1 16 oz can of chickpeas (garbanzo beans) – drained

1/3 cup tahini

1/4 cup lemon juice + a little extra (bottled or fresh, although fresh is yummier in my opinion)

2 cloves garlic – crushed or diced

1 tsp salt or to taste

water (I use roughly 1/3 cup)

olive oil

paprika

Directions:

In a food processor, blend the chickpeas, tahini, lemon juice, garlic, salt and water (the amount of water you add depends on the consistency you like your hummus to be.  Less, for chunkier, more of smoother.  Using just under 1/3 cup gives you a really creamy texture) until the mixture is well blended.  Scoop the hummus into a dish and garnish with paprika, drizzled olive oil and a bit more lemon juice/pulp.  Voila!

Raf said this is better than any store bought hummus he has had.  Success!

Hummus 2

Filed Under: Recipe Tagged With: chickpeas, garbanzo beans, hummus, paprika, recipes, tahini

Postpartum Care Package

March 29, 2013 by lauren.anvari@gmail.com 4 Comments

photo (8)

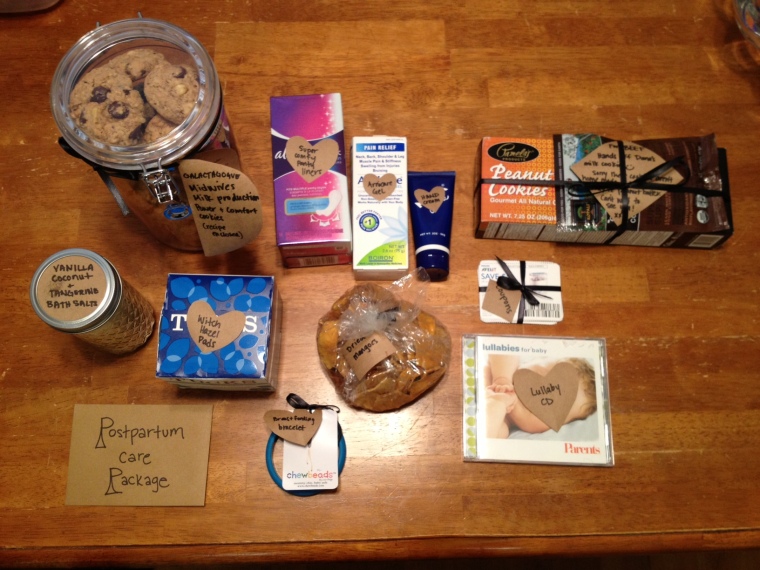
My cousin had a really long and difficult labor so I decided to put together a little postpartum care package for her to make the transition home a little easier, because let’s be honest, having a newborn is amazing but it can also be pretty challenging.

Here’s what I sent her:

Galactagogue Milk Production Cookies:  My midwives gave me this recipe after I had Asher.  These cookies aren’t the tastiest things mainly because they’re pretty dry, but they do help support your milk supply, so you can’t argue with that.  I listed the recipe at the end of this post.

Always Radiant Incredibly Thin Liners (unscented):  Once the heavy postpartum bleeding (lochia) subsides, these liners were incredibly useful in dealing with the lighter stuff.  They are SUPER comfortable.  Seriously, I didn’t even notice they were there.  They also can come in handy if you have a difficult time holding your urine postpartum.  CLICK.

Arnicare Arnica Gel:  This stuff is amazing! Use it on your nether regions to sooth and promote healing.  Seriously, AMAZING.  CLICK. You should also be able to find it at Whole Foods.

Hand Lotion:  If you’re like me, when you have a newborn you kind of become obsessed with washing your hands, so a good hand cream can prevent dry, cracked skin, especially since dehydration is par for the course when it comes to the postpartum time.  All that water you’re guzzling is going straight to your milk supply. Which brings me to…

Dried Fruit:  Allow me to introduce you to dehydration’s nasty little friend, constipation.  Generally the hospital will recommend that you take Colace and I TOTALLY agree, but it doesn’t hurt to stack the deck with some good old fashioned fiber.  Bran muffins are also a good call.  I opted to send the dried mango that you can find in the bulk food bins at most Whole Foods, because it’s SO good.

Witch Hazel/Tucks Pads:  Helps to reduce swelling and sooth your sore nether regions.  Also useful if you got hemorrhoids.

Bath Salts: Every woman deserves some ‘me’ time during the postpartum period that doesn’t just involve sleeping, although that is important too.  Nurse your little one and then hand the baby over to dad or any other willing volunteer that you trust and give yourself a nice steamy soak.  The hot water will help get the blood flowing, which in turn speeds up healing and a fragrant bath is just far more relaxing and luxurious than your run of the mill sitz bath.

Breastfeeding Bracelet:  It’s not always easy to remember what side you need to breastfeed on next, so having a bracelet that you can easily move from side to side is super handy.  I opted for chewbeads, because they can double as teethers later on.  CLICK.  You should always start on the side your baby fed on last, that way you ensure that your baby will drain your breast completely (which can help prevent mastitis) and gets the higher calorie hind milk.

Lullaby CD:  To help sooth the little one.  We made this CD part of Asher’s nightly routine and whenever he hears it, he knows it’s time to wind down and go to bed.

A Daddy Gift: Don’t leave Dad out.  He deserves a little something nice too.  I included Peanut Butter cookies, because this Dad LOVES them and dark chocolate covered espresso beans because he’s really into coffee and the caffeine doesn’t hurt either when you have a newborn.

I also sent some coupons that I didn’t need and thought she may be able to use.  Babies are pricey y’all!

Here are some more ideas of things that you could include in a postpartum care package:

Nursing pads

A nice bedside carafe or water bottle

Sitz bath salts or herbs

Fenugreek capsules

Mother’s milk tea

Breast heating/cooling pads

C-Panty Incision Care Panty -For moms who have had a c-section

Nursing tank tops

———————————————————————————-

Midwives Milk Production Power and Comfort Cookies Recipe
2 c whole wheat pastry flour (regular whole wheat ok too)
1 cup oats
½ cup ground flax seeds
½ cup nutritional yeast (not baker’s yeast but the yellow flakes)
1 tsp baking soda
1 tsp salt
1 cup butter softened
1 cup raw sugar
1 tsp vanilla
2 organic eggs
2 cups dark chocolate chips
1 cup walnuts
Mix up the dry, add to the creamed wet and bake at 350 until golden.

Filed Under: My life, Product review, Recipe Tagged With: arnica, arnicare, birth, care package, healing, labor, midwives, milk production, milk supply, panty liners, postpartum, postpartum care package, Pregnancy, witch hazel

Recipe: Happy Thanksgiving!

November 22, 2012 by lauren.anvari@gmail.com Leave a Comment

UPDATE: We adopted a plant based diet in September 2013 so, while this was definitely yummy, it no longer reflects the food we eat.

I hope you all have a wonderful Thanksgiving holiday and eat lots of delicious food.   Raf and I will be spending the holiday with my Aunt and Uncle in Baltimore, and I can’t wait to stuff my face!  Raf’s mom makes a cheesy potato casserole that Raf absolutely loves and it was his only menu item request this year…as it has been every year.  So I’d thought I’d share the recipe with you.

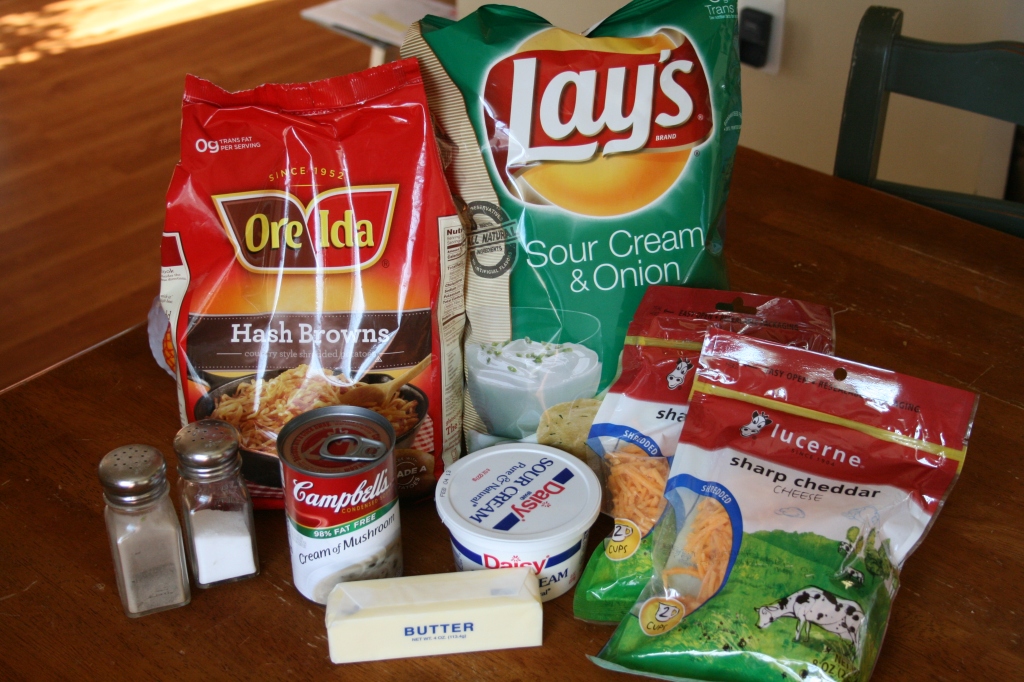
Cheesy Potato Casserole Recipe

Ingredients:

1.5 pound bag of Hash browns (thawed)

8oz Sour cream

1 can Cream of Mushroom Soup

3 cups Shredded Sharp Cheddar Cheese

Salt and Pepper to Taste (go generous with the pepper)

2 Tbsp Butter, cut into small pieces

Sour Cream and Onion Chips, crumbled

Directions:

Preheat over to 350 degrees F.  Combine hash browns, sour cream, cream of mushroom soup, cheese, salt and pepper in a large casserole dish.  Mix well.  Top mixture with crumbled chips.  Top chips with pats of butter spaced evenly apart.  Bake for 25-30 minutes.

It’s that easy!  This is not the healthiest dish, but it’s SO good.  In any case it’s OK to indulge in moderation once in a while.

Gobble Gobble everyone!

Filed Under: My life, Recipe Tagged With: casserole, cheesy potato casserole, hash browns, holiday, recipe, Thanksgiving

  • « Previous Page
  • 1
  • 2

about

follow/contact

  • Email
  • Facebook
  • Instagram
  • Tumblr
  • Twitter
  • YouTube

categories

Copyright © 2025 · Foodie Pro Theme by Shay Bocks · Built on the Genesis Framework · Powered by WordPress